通信工具入门
通信工具介绍
通信工具非常灵活,你可以使用它来管理几乎任何想要在电子邮件之外上报的通信,以便维护在正式的 Procore 记录系统中。
根据我们当前客户的使用方式,以下向你介绍通信工具的用途。
|
|
|
|
|
|


设置
为了开始在项目中使用通信工具,公司管理员必须首先在公司级别创建一个或多个通信类型。
对于没有公司级别管理员权限的人:如果你想开始使用通信工具,请与贵公司的Procore 管理员联系并查看以上列表以获取想法。
管理员步骤:
通信工具不同于 Procore 中的任何其他工具。大多数 Procore 工具适用于特定的业务流程,例如 RFI,并带有关联字段集的预模板,例如所有信息请求都有“任务分配对象”和“截止日期”字段,而通信工具则是供你配置的开放工具。为公司设置新的通信类型时,实际上是在从头开始构建“自定义 Procore 工具”,包括决定哪些数据字段将与其关联。这意味着涉及几个初始设置步骤。
请注意,Procore 为通信类型提供了以下预建模板:
- 附录
- 公告
- 变更请求
- 客户指示
- 约束
- 提早警告通知
- 延期申请
- 一般通信
- 经验教训
- 信函
- 意向书
- 材料请求
- 缓解计划
- 延误通知
- 开工通知
- 扣款通知
- 许可请求
- 项目请求
- 风险识别
- 现场指示
你可以在公司级别管理员工具中查找预建模板。请参阅添加模板通信类型。这些模板帮助你轻松开始使用通信工具 - 然后,当你准备好创建自己的通信类型时,请参考以下步骤。
下面,我们介绍为你的团队设置新通信类型的推荐步骤。你可以为公司创建多种通信类型 - 以下指示将引导你设置一种通信类型。
创建通信类型
需要考虑的事项
- 你为通信类型指定的名称应清楚描述其预期用途(上方列表中显示了一些示例)。类型是项目团队在项目中启动新通信时首先看到的内容,因此请为类型选择一个他们能够识别和理解的名称。
- 建议 - 在通信类型名称中定义一个前缀,以便项目团队可以轻松理解和识别。这便于项目团队在图纸标记中使用或将其链接到其他工具时更容易快速识别通信类型。
- 权限在类型级别应用,并基于模板(通常在公司级别的权限工具中按角色分配)。因此,请考虑谁需要查看和使用此通信类型,并创建单独的类型以适应与不同受众的通信(例如,面向分包商的一般通知和面向业主的一般通知将有所不同)。有关更多信息,请参阅通信:权限。
- 建议- 创建通信类型时选择“默认为私密”。因为通信权限因角色而异,采取此步骤将确保只有特定方(例如特定的分包商)能够看到分配或分发给他们的通信(而不是所有分包商)。(相反,如果通信类型的意图是向特定项目角色的所有成员(例如所有分包商)广播信息,则你应该取消选中“默认为私密”选项。)
- 通信类型也显示在项目主页的项目概况图表上的单独一行中。这样,你可以在每个通信类型中轻松跟踪项状态。
- 如果你的公司正在使用自定义工具(由 Procore 自定义解决方案团队构建),则你不能拥有与自定义工具名称匹配的通信类型。如果你想使用已与自定义工具关联的通信类型,我们建议你更改自定义工具名称。
步骤
创建和应用字段集
需要考虑的事项
- 在此步骤中,你将决定哪些信息(或数据字段)将与此通信类型相关联。你添加的字段将决定项目团队在实际项目中使用此通信类型时将“在野外”收集哪些信息。例如,此通信类型是否需要截止日期、附件字段或记录成本影响的位置?
- 你可以将字段标记为“必填”、“可选”或完全隐藏它们。
- 你可以添加自定义字段,以进一步自定义字段集。
- 你可以为给定的通信类型创建多个不同的字段集,以适应不同项目类型的数据需求变化。
步骤
创建通信类型后,你可以完成创建通信类型的字段集。
更新字段集设置
从下面的第 6 步开始:
- 导航到公司级别管理员工具。
- 在“工具设置”下,点击要为其编辑可配置字段集的工具。
- 点击字段集标签页。
注意:在公司级别管理员工具中没有其他设置的工具将自动打开此页面。 - 点击要为其配置字段集的部分的新建。
- 在“创建字段集”窗口中,输入字段集名称并点击创建。
- 在“编辑字段集”页面上,每个字段名称都有以下选项:
- 点击切换到“开”
 位置,使该字段在本部分中可见。
或者
点击切换到“关” 位置,在本部分中隐藏该字段。
注意:此 图标表示该字段默认可见,不能更改为隐藏。
 - 勾选“必填”复选框将该字段指定为必填字段。
或者
清除“必填”复选框以将该字段指定为可选字段。
注意:- 不具有复选框的字段默认可选,并且不能更改为必填。
- 灰显已标记复选框
 表示该字段默认必填,不能改成可选。
- 点击切换到“开”
- 点击保存。
- 在“将更改应用于 [#] 个项目?”窗口中,点击分配项目将字段集添加到项目。
- 在“分配项目”窗口中,勾选要应用该字段集的各个项目旁边的复选框,然后点击更新。
- 在“将更改应用于 [#] 个项目?”窗口中,点击确认。
- 可选:要将字段集设置为新项目的默认值,请在“字段集”标签页的该行末尾点击
 图标,然后选择设置为新项目默认。
注意
从包含字段集的项目模板创建的项目将继承项目模板中的字段集,而不是公司的默认字段集。请参阅配置项目模板。
可选:将自定义字段添加到字段集
从下面的第 3 步开始:
- 点击字段集标签页。
- 点击要对其添加自定义字段的字段集旁边的编辑。
或者
点击新建以新建字段集。请参阅新建可配置字段集。 - 可选:将该字段添加到自定义部分。请参阅创建自定义部分和什么是自定义部分以及哪些 Procore 工具支持它们?
- 向页面底部滚动并点击添加自定义字段。
- 点击新建。
- 为新字段填写以下信息:
- 字段名称:输入字段的名称。
- 字段类型:选择要创建的字段类型。
注意:某些字段类型可能不适用于所有工具。展开或折叠字段类型选项
- 复选框:该字段将是一个可以选中或清除的复选框。
- 公司:该字段将是一个下拉菜单,允许用户从项目目录中选择公司。
- 日期:该字段将允许用户选择日历日期。
- 文件上传:该字段将允许从 Procore 支持的工具或用户的电脑中添加附件。
- 地点:该字段将是一个下拉菜单,允许用户选择现有地点。
- 多选:该字段将是一个下拉菜单,允许用户选择多个值。
- 数字:该字段将允许输入数字值。
注意:如果用户在“数字”自定义字段中输入的数字不是十进制值或者小数点后面有两个零,则带有该字段的 PDF 导出中的数字将显示为该数字的十进制值,即 .0。例如,如果用户输入 123 或 123.00,则 PDF 导出会将数字显示为 123.0。 - 纯文本(短):该字段将是一个自由文本字段。
- 项目目录用户(多选):该字段将是一个下拉菜单,允许用户从项目目录中选择一个或多个用户。
- 项目目录用户(单选):该字段将是一个下拉菜单,允许用户从项目目录中选择一个用户。
- 只读条目:该字段将允许在文本框中输入在项上可见的消息,例如指示。
- 富文本(长):该字段将是一个富文本字段,支持段落以允许更长的答复以及粗体、斜体和带下划线的文本。
- 单选(下拉):该字段将是一个下拉菜单,允许用户选择一个值。
- 工具用户(单选):该字段将是一个下拉菜单,允许用户选择对工具具有“只读”或更高权限的用户。
- 日期/时间:该字段将是日历菜单和时间条目的组合。
- 对于多选和单选字段类型,请完成以下步骤以添加选项:
- 点击添加选项。
- 在字段中输入选项。
- 对于所需的每个其他选项,点击添加选项并输入选项。
- 点击保存选项。
- 点击完成。
- 点击创建,该字段将自动添加到字段集的底部。
- 点击切换到开启位置使自定义字段在部分中可见,或点击关闭隐藏自定义字段的位置。
- 如果自定义字段为必填,请勾选"必填"复选框。 否则,该字段将是可选的。
- 点击保存。
- 如果字段集已应用于一个或多个项目,请点击应用于现有。
或者
如果刚刚新建了一个字段集,请点击分配项目,并从以下将带有自定义字段的字段集应用到项目部分的第 3 步开始。 - 可选:点击并拖动重新排序点阵
 图标以重新排列自定义字段在字段集中出现的顺序。
注意:Procore 标准字段不能重新排序。
可选:将自定义分项添加到字段集,以组织自定义字段
从下面的第 5 步开始:
- 导航到公司级别管理员工具。
- 在“工具设置”下,点击要为其创建自定义部分的工具。
- 点击字段集。
- 点击要向其添加自定义部分的字段集旁边的编辑
。或者
点击新建以新建字段集。请参阅新建可配置字段集。 - 点击+添加部分。
- 在“添加部分”窗口中,输入部分名称,然后点击添加。
- 要将一个或多个自定义字段添加到新的自定义部分,请点击自定义部分名称下的添加自定义字段。
- 点击从现有中选择以添加现有自定义字段。
或者
点击新建以创建和添加新的自定义字段。请参阅在字段集中创建自定义字段。 - 重复步骤 5-8 以添加更多自定义部分。
- 可选:要重新排列自定义部分,请执行以下步骤:
- 将光标悬停在自定义部分旁边,直到出现点阵图标 。
- 点击点阵图标并将自定义部分拖动到另一个自定义部分的上方或下方。
- 将光标悬停在自定义部分旁边,直到出现点阵图标
- 可选:要将自定义字段移动到不同的自定义部分中,请执行以下步骤:
- 将光标悬停在自定义字段旁边,直到出现点阵图标 。
- 点击点阵图标,然后将自定义字段拖动到要移动到的自定义部分中的添加自定义字段按钮上方。
- 将光标悬停在自定义字段旁边,直到出现点阵图标
- 点击保存。
完成创建你的字段集并将其应用于项目
-
将一个或多个自定义字段添加到字段集后,点击保存。
- 在“将更改应用于 [#] 个项目?”窗口中:
重要提示
在至少创建一种通信类型并至少为项目应用一种通信类型的字段集之前,项目中不会显示任何通信工具。- 点击应用于现有,对已应用该字段集的项目保存字段集更改。
或者 - 点击分配项目将字段集添加到项目,或从项目中删除字段集。
- 在“分配项目”窗口中,勾选要应用该字段集的各个项目旁边的复选框,然后点击更新。
- 在“将更改应用于 [#] 个项目?”窗口中,点击确认。
- 点击应用于现有,对已应用该字段集的项目保存字段集更改。
- 可选:要将字段集设置为新项目的默认字段集,请在“字段集”标签页的该行末尾点击图标,然后选择设置为新项目的默认字段集。
调整权限
需要考虑的事项
- 通信的权限设置是基于模板的(通常根据角色),并在公司的权限工具中处理。
- 就像任何其他 Procore 工具一样,每个通信类型都有自己的一组权限。权限设置包括无、只读、标准、管理员和细分权限。
步骤
- 导航到公司的权限工具。
- 点击项目权限模板标签页。
- 点击要为其授予细分权限的模板旁边的操作,然后选择编辑模板。
- 滚动到“通信类型和自定义工具”部分。
- 在每个通信类型的行上选择“无”、“只读”、“标准”或“管理员”列中的按钮。
- 点击尖括号 > 图标可打开或关闭每个通信类型的细分权限菜单。
注意:此图标仅在选择只读或标准按钮时显示。 - 勾选“全部开启”复选框以启用对权限模板的所有通信工具的细分权限。
注意:如果启用了所有通信工具的细分权限,则此复选框名称将更改为“全部关闭”。
或者
勾选要在权限模板上启用的每个细分权限的复选框。
- 点击保存。
在项目中配置高级设置
你可以在项目级别为每个通信类型配置其他设置。你可以使用这些设置:
- 为已逾期项启用电子邮件提醒
- 定义默认通讯名单
- 设置自动答复截止日期
- 添加默认描述
步骤
标签页设置
- 导航到项目的通信工具。
- 点击配置设置
 图标,然后选择要为其配置设置的通信类型。
 - 点击侧边栏中的标签页设置。
- 根据项目的需要完成以下操作:
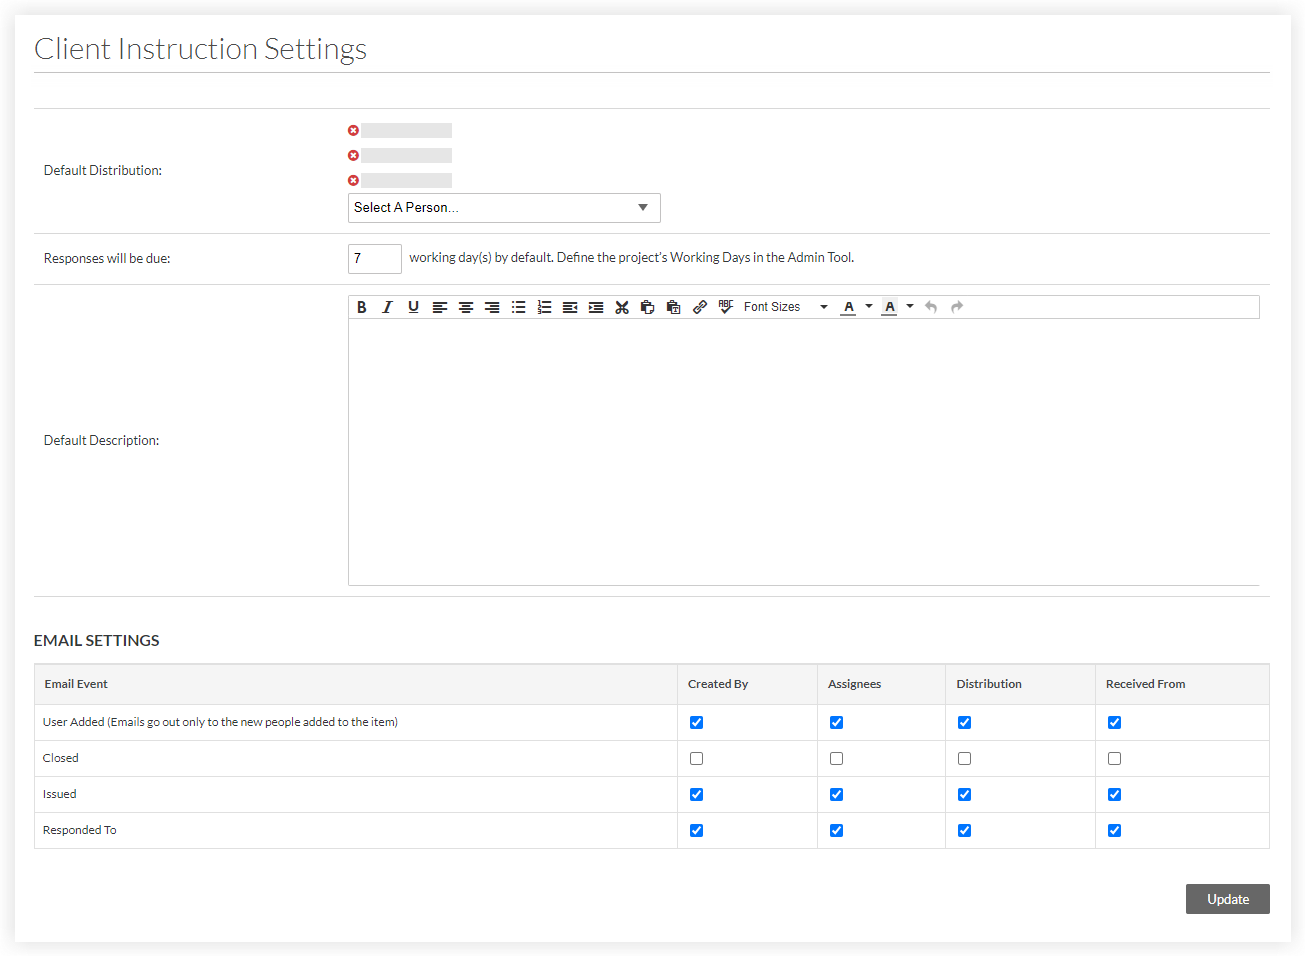
注意:使用此通信类型创建或编辑通信项的用户可以更改单个项的分发、截止日期和描述字段。- 默认通讯对象:从下拉菜单中选择一个或多个用户或通讯组。如果想从该列表中移除用户名称,请点击用户名称旁边的
 图标。
图标。
注意:用户必须对要添加到此列表的通信类型拥有“只读”级别或更高级别权限。请参阅在项目权限模板中授予细分权限。 - 答复距离到期还剩:输入一个默认工作日的数字,在此之后答复将到期。
- 默认描述:输入默认描述以添加到使用此通信类型创建的项。
- 电子邮件设置:勾选或清除每个用户 角色下的复选框,以确定每个电子邮件事件的电子邮件通知的接收者。 请参阅谁会接收通信项电子邮件和推送通知?了解更多信息。
注意:某些电子邮件设置在公司级别配置并影响所有项目。 例如,选中"发送逾期项的电子邮件提醒"复选框 在创建新的通信类型中进行描述。重要提示
如果项目使用自定义通信自助式工作流,则该项目的通信项电子邮件通知将通过工作流配置设置进行管理。 请参阅(测试版)何时发送自助服务自定义工作流的电子邮件通知?欲了解更多信息
- 默认通讯对象:从下拉菜单中选择一个或多个用户或通讯组。如果想从该列表中移除用户名称,请点击用户名称旁边的
- 点击更新以保存更改。
权限表
- 导航到项目的通信工具。
- 点击配置设置图标,然后选择要查看其用户权限的通信类型。
- 点击侧边栏中的权限表。
显示通信类型的用户权限表。- 绿色对勾
 图标表示已授予用户的通信类型的权限级别:“无”、“只读”、“标准”或“管理员”。
 - 红色
 图标表示哪些权限级别未分配给用户。
 - 灰色
 图标表示哪些权限级别未分配给用户,并且由于已为用户分配项目权限模板,因此当前无法更改。要在项目级别目录工具中更改他们的权限,请参阅在项目目录中更改用户权限。
- 绿色对勾
- 要在没有为用户分配项目权限模板的情况下更改用户对通信类型的权限级别,请点击红色 图标,获取你要授予用户的权限级别。
此红色图标替换为绿色对勾 图标,并自动保存用户对通信类型的权限级别。
最佳实践
计划
因为通信非常灵活,所以请务必提前制定好全面计划,这样才能确保它能满足你团队的需求。
需要考虑的事项
- 调查内部利益相关方。你可以创建多种通信类型 - 确保你已获得团队的意见,了解哪些类型对他们的项目最关键或最有益。
- 确定合适的流程。对于给定的流程,如果你对以下问题的回答为“是”,则通信可能很合适。
- 这个流程是否基于共享信息和与其他利益相关方沟通?你是否需要利益相关方负责接收或回应这些信息?
- 目前是否通过电子邮件,甚至电话/短信处理此流程?
- 围绕此流程将通信正式化和集中化对你的企业是否有益?
- 如果此流程没有得到恰当跟踪或记录,是否存在时间或金钱损失的风险?
- 你是否有用于此过程的现有模板?
- 你目前是在 Procore 之外还是在 Procore 的自定义工具中完成此流程?
- 是否需要将此流程与 RFI 和变更事件联系起来以进行全面的跟踪和跟进?
- 链接到图纸标记是否会帮助推进此流程?
- 评估全局。制定你的通信类型及其关联数据计划,以确保高效使用通信,避免冗余,并且能符合团队和流程需求。
部署
成功的部署和采用该工具需要团队加入并开始使用新功能。这意味着人员需要了解功能、预期用途以及从哪里寻求帮助和反馈!